Local Storage seems to be disabled in your browser.
For the best experience on our site, be sure to turn on Local Storage in your browser.
Choose your country
europe
.jpeg)
Avalanche safety for lift-accessed backcountry freeriding
January 27, 2022
9 min read
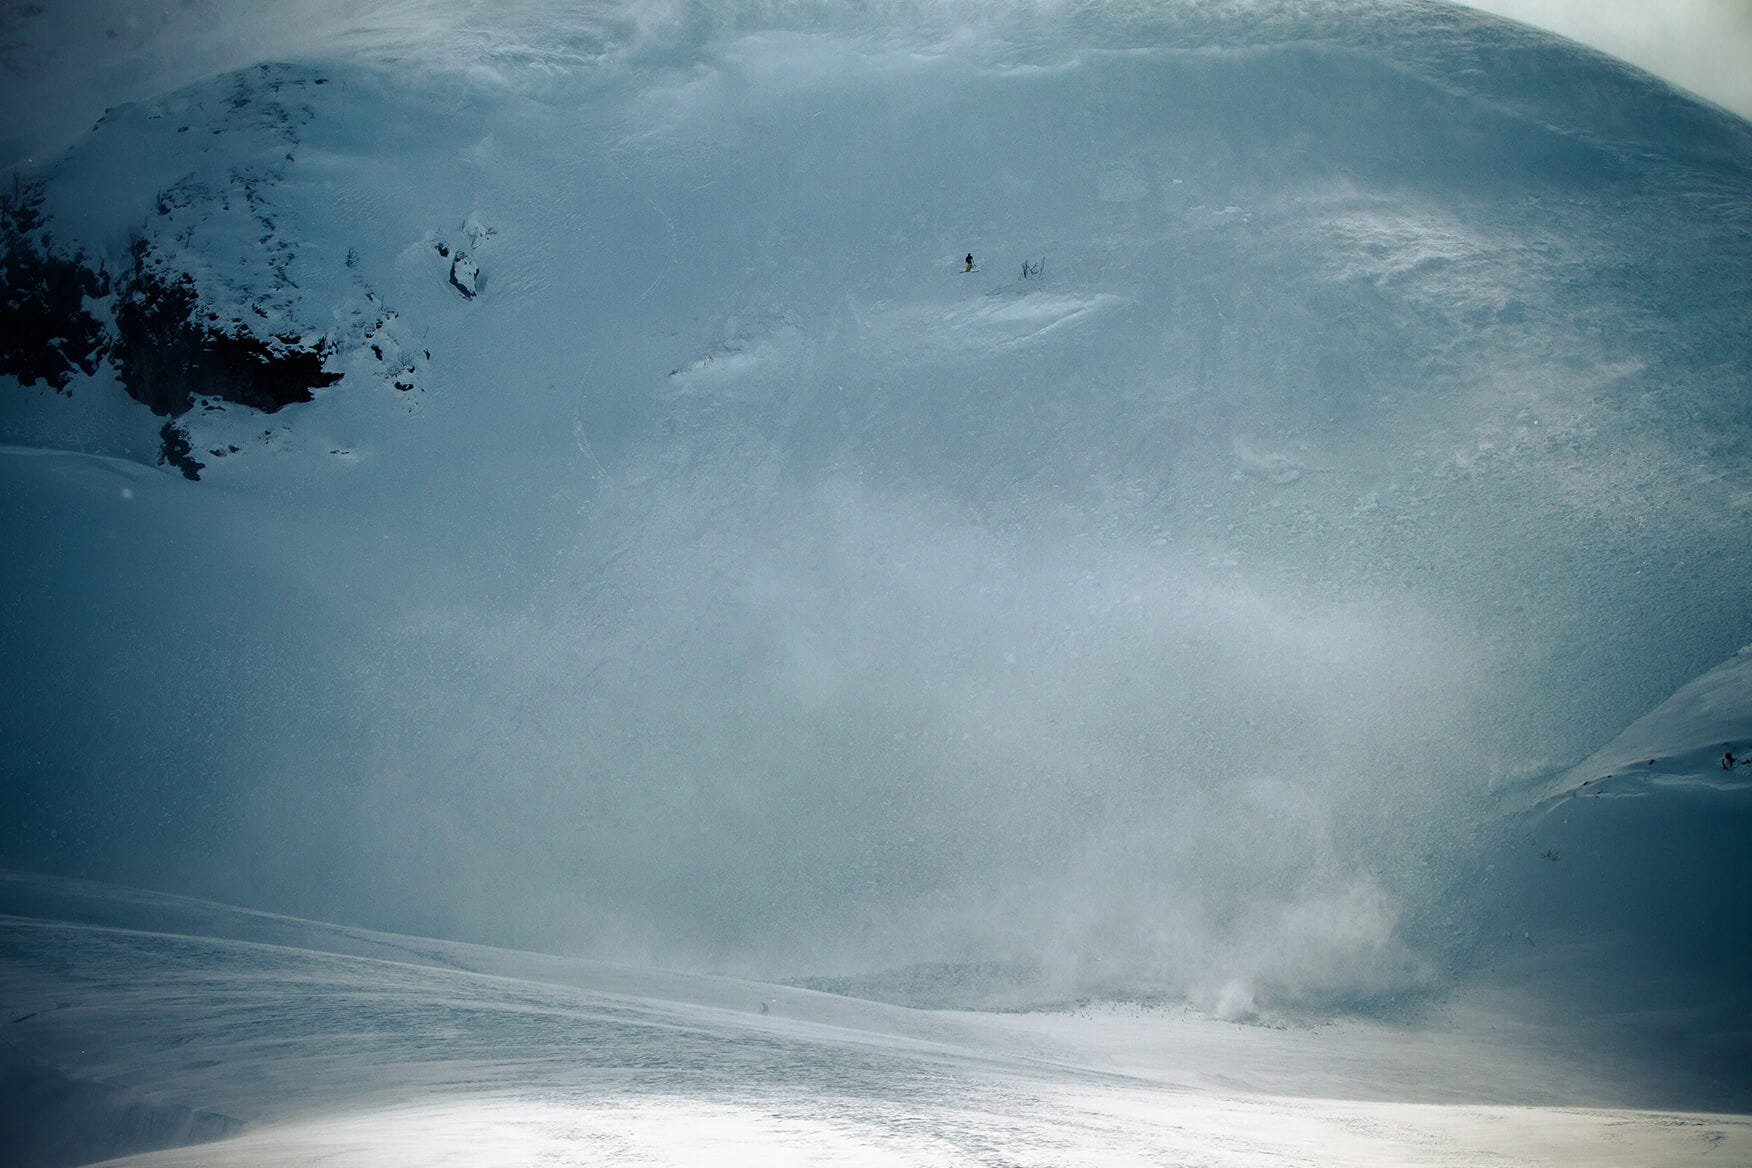
The evolution of wide powder skis has made lift-accessed freeriding increasingly popular.
On days with fresh powder snow, trails will soon appear in the vicinity of certain resorts. It’s hardly surprising: after all, the lift enables efficient skiing, with the potential for plenty of great turns without spending too much effort going up.
It’s important to keep in mind, however, that being near a resort can give a false sense of security. Outside the marked slopes and resort boundaries, it’s just like anywhere else in the mountains: you are responsible for your own safety. And even though many people associate avalanches with high mountains, summit climbs, and deep powder in mid-winter, it can just as easily happen early in the season, right by the resort trail, on a slope with little snow.
Here, four experienced mountaineers (freerider Dennis Risvoll, anesthesiologist and Norwegian People's Aid volunteer Live Kummen, Norwegian People's Aid avalanche expert Vegard Olsen, and general manager of Norwegian Ski Resorts and Mountain Destinations Camilla Sylling Clausen) discuss what to keep in mind the next time you set off from the lift and exit the resort gates into the backcountry.


Photos by: Lorenzo Verdinelli
Avalanches in ski resorts?
“When you stay on marked and groomed slopes, you’re safe, but of course we know that there’s also a lot of lift-accessed backcountry and sidecountry skiing right outside the resort boundaries. And there, it’s just like elsewhere in the mountains: you’re completely on your own, and responsible for your own safety,” says Camilla Sylling Clausen, general manager of the industry organization Norwegian Ski Resorts and Mountain Destinations.
“Regardless of the distance from the marked and groomed slope, you must be able to recognize steep terrain so that you know where avalanches may occur. It’s also important not to ski alone, no matter how tempting it is, because if you’re caught by an avalanche, or perhaps break your leg, you’ll be outside the patrolled areas. It’s also essential to bring an avalanche transceiver (also referred to as a ‘beacon’), a shovel, and a probe, and to learn how to use the equipment. If an accident does happen, it’s your skiing buddy who will save you. Getting a rescue team there will take time, and if there’s been an avalanche, minutes really matter.”
Learn to recognize avalanche terrain
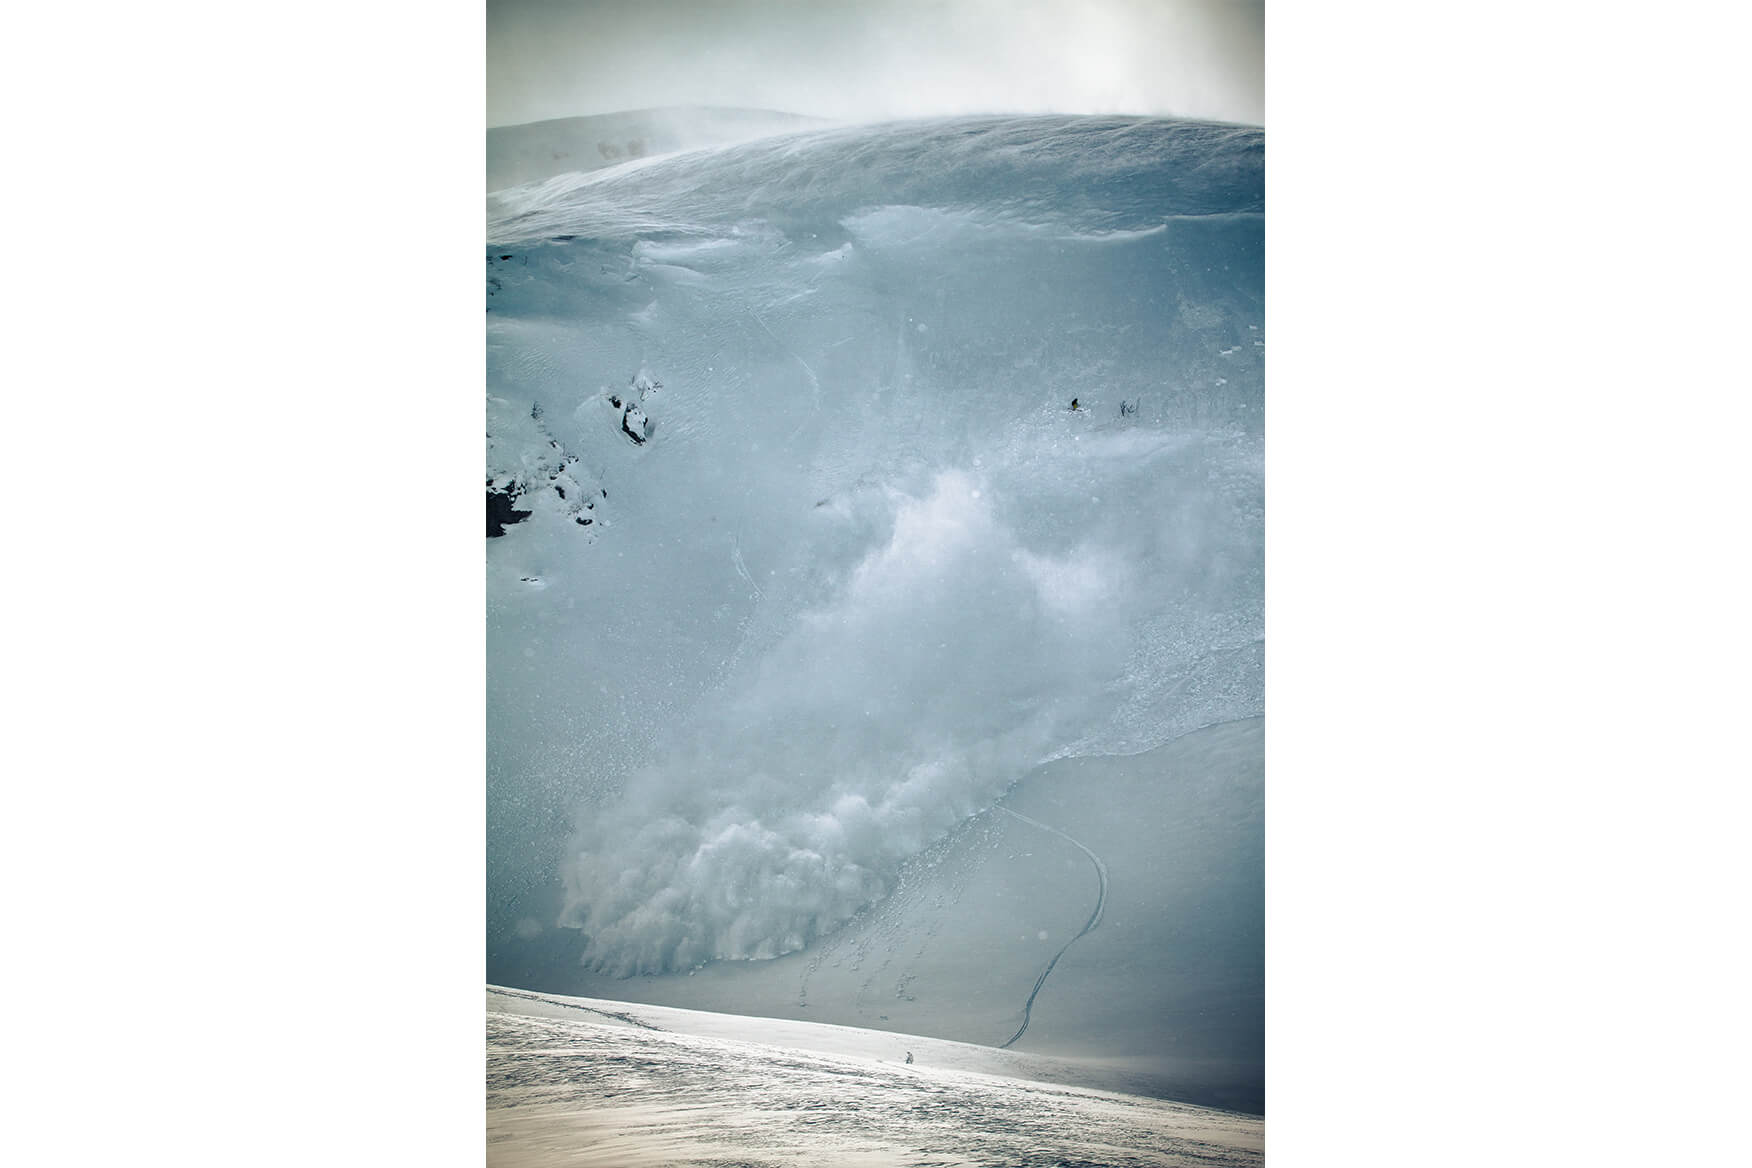
According to avalanche expert Vegard Olsen from the humanitarian organization Norwegian People's Aid, “staying on slopes of less than 30 degrees will take you a long way if you’re unsure. But keep in mind that there’s something called runout zones. Even if you’re in a spot where the slope is less than 30 degrees, there may be steeper terrain above you, and you could be in the runout zone for an avalanche.”
“Having an idea of what 30 degrees looks like is also an important exercise. It roughly corresponds to the landing hill of a ski jump, so it's pretty steep. If the snow rolls down the slope by itself, then it’s usually above 30 degrees, but by then it’s often a bit late to choose another path.”
You must pay attention to the terrain you’re skiing into, and keep in mind that short, isolated slopes can be risky even when they’re near safe trails. When you're taking off from a ski lift, you lose the dimension of going uphill and reading the terrain.
"When you’re at the bottom of the lift, it’s not always easy to see where it’s safe to ski," says Camilla. "And the fact that someone has skied there before you does not mean that it’s safe."

Check avalanche warnings
Most ski resorts have information boards,websites and ski patrol hotlines dedicated to detailing the avalanche danger level for the day. However, it’s still a good idea to get into the habit of checking local avalanche forecasts and warnings yourself.
“Varsom.no is our go-to resource in Norway. The work that’s been done by the Norwegian Water Resources and Energy Directorate (NVE) to develop varsom.no is fantastic. The avalanche warning indicates the danger level for a given area, and anyone going into the mountains should have that information. Of course, it doesn’t provide a definitive answer to everything, but it’s a good indicator, and based on the warning you can already assess whether exposing yourself to steep terrain is a good choice or not. Local assessments out in the field are the most important, but varsom.no is a great starting point for planning," says Vegard.
For North American freeriders, avalanche.org is a fantastic initial resource for avalanche conditions and forecasts.
Remember, too, that most avalanche accidents don’t occur when the danger level is highest.
“Avalanche danger level 2 may sound very low on a scale that ranges from low (1) to extreme (5), but that’s actually where most accidents happen, maybe precisely because people think it’s safe. Perhaps you lower your guards a little, and then you ski in places where you shouldn’t and where avalanches can be triggered. Another important point to keep in mind is that between level 2 and level 3, the risk is doubled. If you’re in the mountains when the avalanche danger level is 3 or above, you can hear rumbling around you, and that isn’t comfortable. But then again, you can choose safe trails,” Camilla explains.
According to Vegard, it might be wise to heed some old wisdom when you’re heading for the mountains.
“Those of us who have been in this game for a while, grew up with the rule of thumb that ‘avalanche weather’ is wind combined with precipitation. It actually doesn’t take a lot of wind to get snow masses moving, and then you get what’s called slab avalanches. They’re the ones we fear as skiers; they represent the biggest threat to us when we’re skiing or snowboarding or whatever. So the old advice to take it easy after avalanche weather, i.e. wind plus precipitation, still applies and it’s something we can stick to. Patience is a good idea.”

Choose the right equipment and learn how to use it
Avalanche transceiver
For freerider Dennis Risvoll, it’s essential to bring avalanche safety equipment with him when he heads into steep terrain.
“First of all, there’s the avalanche beacon, a probe, and a shovel. Avalanche transceivers of the latest generation are good. Many older transceivers require you to search in a specific pattern, while the newer ones often allow you to head straight to the point. If several people have been caught, for example, you can just mark them off, continue to the next one and have everything saved, instead of having to go multiple routes.”
Today, many resorts have Recco systems which enable professional rescue crews to find you if your outerwear or gear are equipped with Recco chips. However, it’s important to remember that the Recco system is only a supplement to the avalanche transceiver, since you can’t use your own chip to search for others, or be searched for by your ski buddy. You can read more about Recco here.
Shovel
"A good shovel is perhaps the most important equipment of all," according to Dennis. “I’ve broken a lot of plastic shovels. When there’s an avalanche, the snow can become so hard that you really need something solid. So I often choose equipment that’s a little heavier, rather than the lightest, because it’s more resistant. It depends on what the avalanche is like and on how humid the snow is, but sometimes it can almost turn to ice, and if it gets hard like that it’s a real struggle to dig someone out. Then you need a solid shovel. It's also nice to have a small emergency kit with different bandages and such. Cuts happen a lot when you’re skiing, even when you’re just standing in the lift line, so it's a useful tool to have. It’s also easy to carry in the backpack, it doesn't take up much space.”
Probe
After many years as a professional freerider, Dennis has learned a number of tricks to make everyday life in the mountains easier and safer. One of them is how to handle the probe.
"I’m not an expert, but I’ve been told that you should never keep the probe in its bag. If you’re in a hurry, you shouldn’t be messing around to get it out of the bag. The bag should be attached to the top of the probe. It will help people see the wind direction and see you from farther away, including the helicopter if there’s a rescue operation.”
Survival shelter
Anesthesiologist Live Kummen volunteers for the Norwegian People's Aid organization, and knows all too well how quickly conditions can change in the mountains.
"If you're having a bit of bad luck in the mountains, there's nothing that can’t get worse by becoming cold. So personally, I think it’s important to bring something to protect you from the cold, ideally a sleeping pad which will insulate you from the ground. Also, keep a survival shelter in your backpack which you can pull over yourself and your travel companions. There are many good options, ranging from very light and compact survival shelters for two people to bigger ones for six to eight, if you want to bring more people along on your trip.”
Helmet
Being caught in an avalanche can be like being hit by a truck. It depends on how much snow you’re hit with, and what type of avalanche it is, but there will be a lot of force and weight involved. An avalanche is a so-called high-energy accident, and head trauma is among the most frequent types of injuries. Wearing a helmet helps prevent head trauma, and many new helmets are equipped with a Recco chip allowing you to be more searchable by professional rescue teams.
Training
Practice, practice, practice, preferably with your skiing buddies. "If you find yourselves in an avalanche, the adrenaline will come and it’s easy to forget what you’re supposed to do. So get it in your fingers, practice when it's calm. For example, clear the snow from the roof of your cabin, put your transceiver in the heap, and try to dig it out from there," says Camilla.
"However, the best advice is to take an avalanche course or two. Going on a group trip in the backcountry with a hired guide is also a fantastic way to practice those course skills and continue to learn with a professional that is highly trained in avalanche safety.”
Many Norwegian and North American ski resorts also have dedicated practice areas, where you can test your beacon to ensure it’s transmitting properly, as well as practice searching with an avalanche transceiver.

Manage the group
“Always keep in mind that off the marked slopes and outside of resort boundaries, it’s like anywhere else in the mountains: you’re responsible for your own safety. That also means that your skiing buddies must be able to cope if something goes wrong. Never ski alone, and make sure that everyone in your group knows how to use the safety equipment. You’re not going to save yourself, you’re the one who will save me if we’re skiing together. I have to know that you’ll be able to find me and dig me out," says Camilla.
Everyone must be searchable, but when you’re going downhill it’s also important to stay aware of where your companions are. Go one by one and regroup at specific meeting points throughout the downhill journey to minimize the strain on the snowpack, and keep an eye on each other so that you know everyone’s approximate position if something happens.
Enjoy the mountains
When you practice lift-accessed freeriding, it’s important to always know where you are, should you need help in the event of an injury or an avalanche. Even if you’re near a ski resort, don’t hesitate to call the emergency number. They can connect you to a ski patrol and local helpers in the event of a search operation. In the backcountry there can be limited cell phone reception, so bringing a satellite communication device can be a crucial life-saving device. Not only do they allow you to communicate along the way and during emergencies without needing cell phone reception, many satellite messengers can also track your location and show GPS mapping.
And lastly, don’t let fear of avalanches ruin the joy of skiing. The more you learn, the safer choices you can make, and the more fun you can have in the mountains. Remember, too, that if you’re in a new and unfamiliar area, it’s never wrong to ask local guides or ski patrols for advice. They will be more than happy to help you find safe areas.
Enjoy your trip! And remember to check localized avalanche forecast resources:
Norway
North America
All freeriders are encouraged to visit carepanel.no, where you can contribute to research on how we navigate the mountains and what decisions we make.
* This article is based on a panel discussion organized by Helly Hansen on November 10, 2021. The conversation was led by summit enthusiast and former alpinist Tom Stiansen. You can watch the whole conversation (in Norwegian) here.